To make no-knead bread in a smart bread maker, start by gathering ingredients like flour, water, yeast, salt, and sugar, then organize your workspace. Load the dry ingredients into the machine, create a well for yeast, and add water. Select the dough or manual cycle, then let the machine handle kneading and rising. Once done, shape, apply an egg white wash, proof, and bake until the crust is golden and crisp. Keep exploring for step-by-step guidance.
Key Takeaways
- Add dry ingredients and yeast to the bread machine pan, then pour water and optional ingredients before selecting the “dough” cycle.
- Maintain proper layering and set the machine to a 70-80°F environment for optimal fermentation and rising.
- Remove the dough carefully after the cycle, shape into a loaf, and brush with beaten egg white for crust enhancement.
- Final proof the shaped dough in a warm area for 20-30 minutes, then score and prepare for baking.
- Preheat oven to 400°F, bake the loaf until deep golden brown (18-25 mins), and ensure internal temperature reaches 190°F.
Gathering Ingredients and Preparing Your Workspace

Before you begin, gather all the necessary ingredients for your no-knead bread: 2 cups of all-purpose flour, 2/3 cup of water, 1 teaspoon of instant yeast, 1 teaspoon of salt, and 1 teaspoon of sugar. Choose a clean, organized workspace with ample surface area to work comfortably. Clear the countertop of clutter and set out measuring cups, spoons, a mixing bowl, and a spoon or spatula. Keep ingredients within easy reach to streamline the process. Confirm your bread machine is nearby, clean, and ready to use. Prepare a small towel or plastic wrap for covering the dough if needed later. Having everything prepared and within reach helps keep the process smooth and efficient, so you can focus on making your no-knead bread without interruptions. Additionally, understanding the at-home baking process can improve your results and enjoyment, especially when working with natural fermentation techniques. Knowing the bread-making fundamentals can also help troubleshoot common issues and refine your technique. Familiarity with dough development techniques can further enhance your bread’s texture and flavor.
Loading the Bread Machine With Ingredients
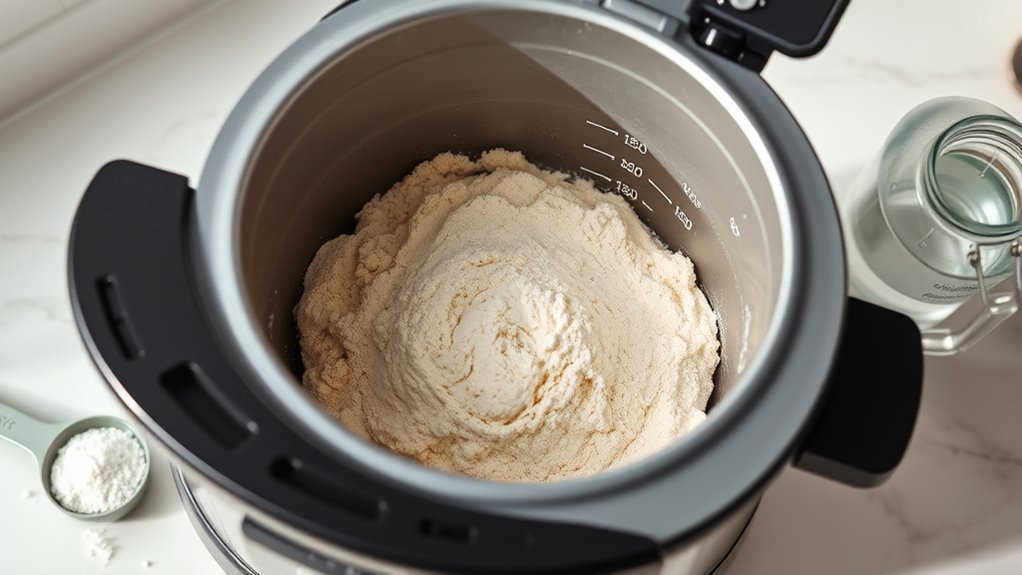
To load your bread machine with ingredients, start by adding the dry ingredients directly into the pan—measure 2 cups of all-purpose flour, 1 teaspoon of salt, and 1 teaspoon of sugar—and pour them in evenly. Next, create a small well in the center of the dry ingredients and add 1 teaspoon of instant yeast. Then, pour in 2/3 cup of water, ensuring it touches the yeast but doesn’t spill over the edges. If your recipe calls for it, add a beaten egg white or other optional ingredients at this stage. Be sure to keep the ingredients dry and separate until the machine begins its cycle, preventing premature activation of the yeast. Proper layering guarantees an even mixing process and a successful no-knead bread result. Additionally, ensuring proper ventilation considerations can help maintain optimal baking conditions and prevent moisture buildup inside your bread machine. Maintaining good kitchen airflow can also contribute to more consistent baking performance and help prevent condensation issues. Regularly checking and cleaning your bread machine’s vents can further optimize baking efficiency and prolong the appliance’s lifespan. Incorporating proper air circulation within your kitchen space can further support consistent baking results and prevent excess humidity from affecting the bread. Proper temperature control can also influence yeast activity and dough rise, leading to better loaf texture and flavor.
Configuring the Dough Cycle on Your Bread Maker

Setting up the dough cycle correctly guarantees your no-knead bread turns out perfect. First, select the dedicated “dough” or “manual” setting on your bread maker. Confirm the machine capacity matches your recipe, typically 1.5 to 2 pounds of dough. Input the ingredients directly into the pan: flour, water, yeast, salt, and optional sugar or egg white wash. Use the recommended ratios for no-knead recipes. Adjust the cycle time if your machine allows; generally, 1.5 to 2 hours covers kneading and initial rising. Verify the temperature control is set to maintain 70-80°F for proper fermentation. Activate the timer if you want the dough ready at a specific time. Once started, let the machine handle the kneading and first rise, ensuring consistent gluten development.
Removing and Shaping the Dough Post-Cycle
Once the bread machine completes its cycle, carefully remove the dough from the pan using a rubber spatula or your hands, taking care not to deflate it. Gently transfer the dough onto a floured surface. Use your hands to shape it into a round or oval loaf, maintaining its airy structure. If needed, lightly dust the top with flour to prevent sticking. To help you shape confidently, here’s a quick guide:
| Step | Tip |
|---|---|
| 1 | Handle dough gently to keep air pockets intact |
| 2 | Use a bench scraper for tight edges |
| 3 | Tension on the surface helps shape evenly |
| 4 | Lightly flour your hands for easier handling |
| 5 | Don’t overwork the dough to avoid deflation |
Additionally, practicing proper content structure can enhance readability and user engagement. Incorporating proper shaping techniques can further improve the final loaf’s appearance and texture. Understanding how alarm clocks can assist in timing your baking process might also help you stay on schedule. Being aware of visual and auditory cues can aid in achieving consistent results during bread shaping. Moreover, paying attention to dough temperature can greatly influence the final rise and texture of your bread.
Applying Egg White Wash and Final Proofing
Applying an egg white wash enhances your bread’s crust, giving it a glossy, professional finish. Make sure to brush it evenly after shaping and before the final proof, ensuring full coverage without over-saturation. Keep in mind that proper final proofing allows the crust to develop fully, resulting in a crisp, golden exterior. Using a balanced moisture level during proofing can further improve crust quality and texture. Additionally, maintaining appropriate piercing techniques during shaping can help prevent cracks and promote even baking. For optimal results, consider how ambient light conditions can influence the appearance of your bread’s crust during baking.
Egg Wash Application
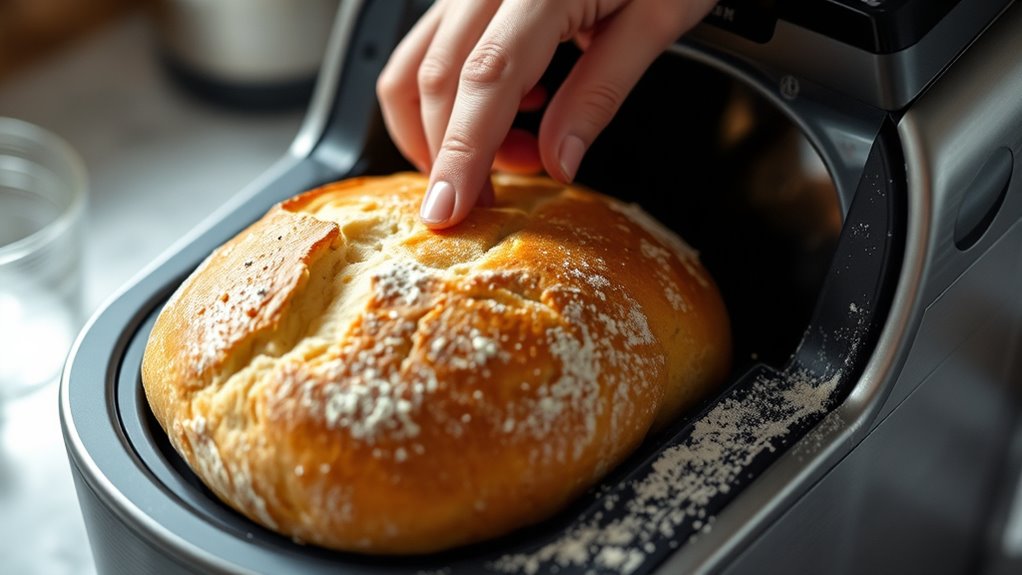
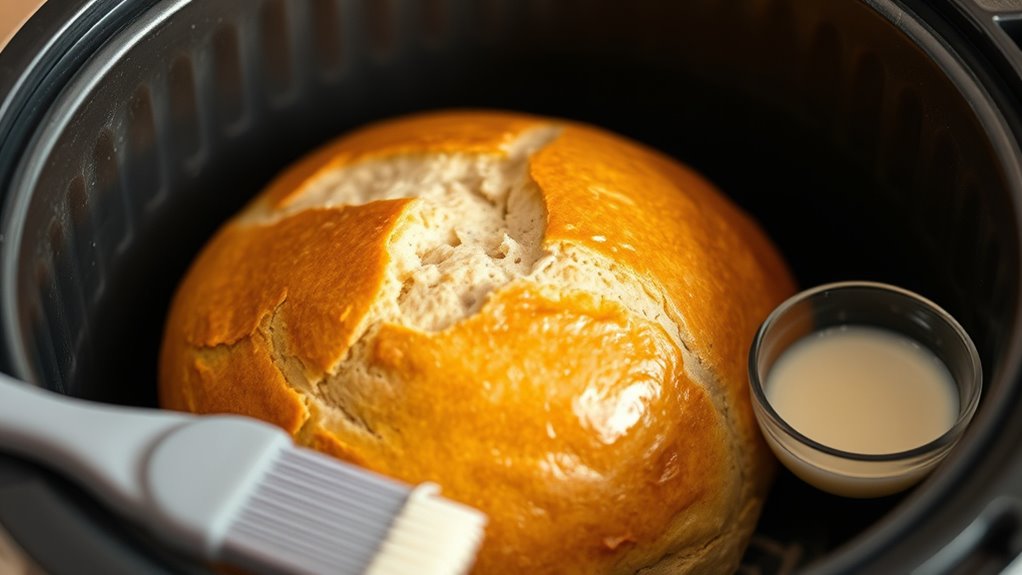
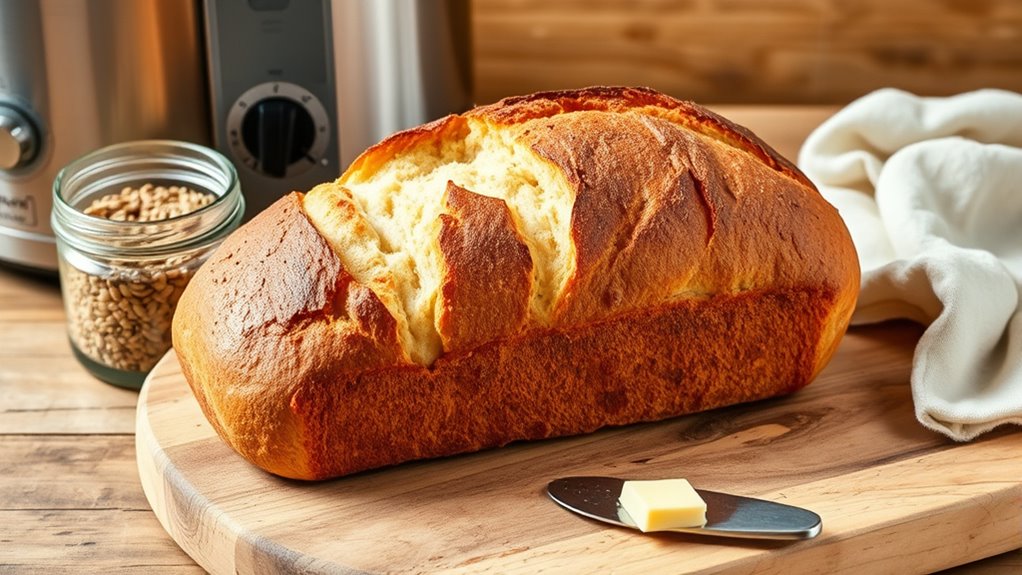
To achieve a crisp, professional crust on your no-knead bread, you’ll want to apply an egg white wash before baking. After shaping your dough on a floured surface, gently brush the surface with beaten egg white using a pastry brush. This layer enhances browning and creates a shiny, crackly crust. If you prefer an even glossier finish, repeat the application immediately before placing the bread into the oven. Be careful not to overload the surface with egg wash, as excess can cause uneven browning or pooling. Allow the wash to dry slightly before baking to make certain it adheres properly. This simple step elevates your homemade bread, giving it a bakery-quality appearance and texture. Using high-quality ingredients can also improve the overall bread quality and flavor of your finished loaf. Additionally, understanding the role of cookie categories can help optimize your website’s performance when sharing your bread-making process online. Incorporating proper air purifier maintenance techniques can help keep your kitchen air clean, especially when working with flour dust or baking fumes. Maintaining a clean environment is especially important for kitchen air quality to ensure a healthy baking experience. Implementing sustainable materials in your baking tools and ingredients can further support eco-friendly practices in your kitchen.
Final Proofing Tips
Before final proofing, make sure your shaped dough is properly prepared for its last rise by gently brushing it with an egg white wash. This creates a glossy, crisp crust and enhances browning. Lightly beat one egg white until frothy, then use a pastry brush to coat the dough evenly. Be careful not to over-apply; a thin, even layer is best. After brushing, allow the dough to rest for 20-30 minutes in a warm, draft-free area, ideally at 70-80°F. This final proof helps develop the crust and ensures proper oven spring. Keep the dough covered loosely with plastic or a damp cloth to prevent drying. When ready, score the loaf diagonally to allow steam to escape and promote a professional appearance. Verifying your bread’s final proofing conditions can help avoid common baking pitfalls. Proper proofing environment is essential for achieving optimal bread texture and appearance. Understanding proofing conditions can also help troubleshoot issues like under- or over-proofing, leading to better results. Additionally, monitoring proofing temperature and humidity can further improve your bread’s final quality.
Baking the No-Knead Bread to Perfection

To achieve a crispy crust and guarantee proper doneness, you need to pay close attention during baking. Preheat your oven thoroughly and use the right temperature to get that perfect crunch. Keep an eye on the internal temperature to make sure your bread is fully cooked without overbaking. Additionally, using a transfer switch can help safely manage your oven’s power supply during outages, ensuring consistent baking conditions.
Achieving Crispy Crust
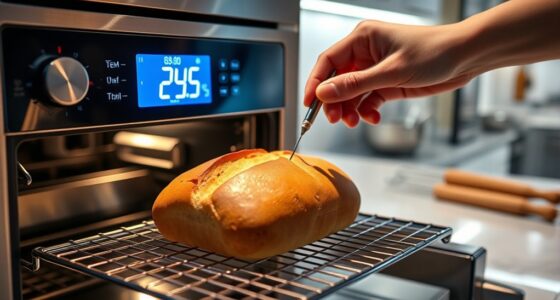
Achieving a crispy crust on your no-knead bread starts with proper baking techniques. Start by preheating your oven to 400°F at least ten minutes before baking. Sprinkle cornmeal on your baking sheet to prevent sticking and help develop a crust. Apply an egg white wash twice: once after shaping and again just before baking, to enhance crispiness. Bake your bread until the crust is deep golden brown, usually 18-25 minutes, depending on your oven and preferred crust darkness. Use a thermometer to check that the internal temperature reaches at least 190°F for proper doneness. Avoid opening the oven frequently during baking, as this can soften the crust. Allow the bread to cool slightly on a wire rack to set the crust and preserve its crunch.
Ensuring Proper Doneness
Ensuring your no-knead bread is properly baked requires paying close attention to internal temperature and crust development. Use a digital thermometer to check if the internal temperature reaches at least 190°F; this confirms thorough baking and safe consumption. Look for a deep, golden-brown crust that indicates caramelization and proper crust formation. If the crust is too pale, bake a few minutes longer, but avoid over-baking to prevent dryness. Keep an eye on the oven’s heat and adjust the timing if necessary, especially since oven calibration varies. Once the bread hits 190°F and has a rich crust, remove it from the oven and let it cool on a wire rack. Proper doneness guarantees a moist interior with a satisfying crust, ready for slicing.
Serving Suggestions and Storage Tips
Serving your no-knead bread at its best involves choosing the right slices and presentation. For an appealing look, slice the bread when it’s completely cooled to prevent squishing. Use a serrated bread knife to achieve clean, even slices. Pair it with butter, jam, or cheese for a simple yet satisfying snack. To keep your bread fresh, store it in a paper bag or bread box at room temperature for up to two days. For longer storage, wrap it tightly in plastic wrap or foil and freeze it for up to three months. When ready to enjoy, reheat frozen slices briefly in the oven or toaster to restore crust crispness. Avoid refrigerating bread, as it speeds up staling. Proper serving and storage keep your bread tasting fresh and delicious.
Frequently Asked Questions
Can I Substitute Different Types of Flour in This Recipe?
Yes, you can substitute different types of flour in this recipe. Keep in mind that each flour has unique absorption and gluten content, which affects the dough’s consistency and texture. For best results, start with a small batch and adjust water quantities as needed. Whole wheat, rye, or gluten-free flours work, but you might need to tweak ratios or add essential wheat gluten for improved structure.
What Adjustments Are Needed for Gluten-Free or Whole Wheat Options?
Think of adjusting your bread like tuning a guitar string. For gluten-free flour, add a bit more water or a binding agent like xanthan gum to mimic gluten’s structure. Whole wheat flour needs slightly less water—about 10-15% less—since it’s denser. You might also reduce the yeast slightly to prevent over-proofing. Keep an eye on dough consistency and adjust water accordingly for the best results.
Is It Possible to Skip the Egg Wash Without Affecting Crust Quality?
Yes, you can skip the egg wash without considerably affecting the crust quality. The egg wash mainly helps create a crisp, glossy crust, but you can achieve a similar effect by brushing the loaf with water or milk before baking. For extra crunch, sprinkle some cornmeal or a light mist of water onto the dough before baking. This way, your bread still develops a beautiful, appealing crust.
How Do I Troubleshoot if My Dough Doesn’t Rise Properly?
When your dough isn’t rising as beautifully as it should, think of it as a gentle nudge rather than a setback. First, check that your yeast isn’t past its prime and that your ingredients are fresh. Confirm the dough stays in a warm, draft-free spot around 70-80°F. If it’s still sluggish, give it a little more time—sometimes patience is the secret to perfect rise.
Can I Use the Same Process for Smaller or Larger Bread Batches?
Yes, you can modify the process for smaller or larger batches. For smaller batches, reduce ingredients proportionally and guarantee your machine’s capacity isn’t exceeded. For larger batches, increase ingredients but stay within the machine’s maximum capacity, typically 1.5-2 pounds. Keep an eye on the dough’s consistency, and avoid overloading the machine to prevent improper kneading or rising issues. Always follow your bread maker’s guidelines for ideal results.
Conclusion
With patience and a touch of care, you’ve crafted a loaf that rises like a symphony from the oven’s warmth. Each slice reveals the harmony of simple ingredients transformed into something extraordinary, a tribute to your gentle touch. Like a well-tuned instrument, your bread sings of dedication and artistry. Now, as you savor every bite, remember that this humble creation is a living melody, nourishing both body and soul, crafted by your own hands.