
TL;DR
Moving your AI rig into a closet can drastically cut noise and heat issues. The key is balancing soundproofing, ventilation, and strategic placement, rather than just slapping foam on the walls. Done right, it’s a quiet, cool powerhouse in a tiny footprint.
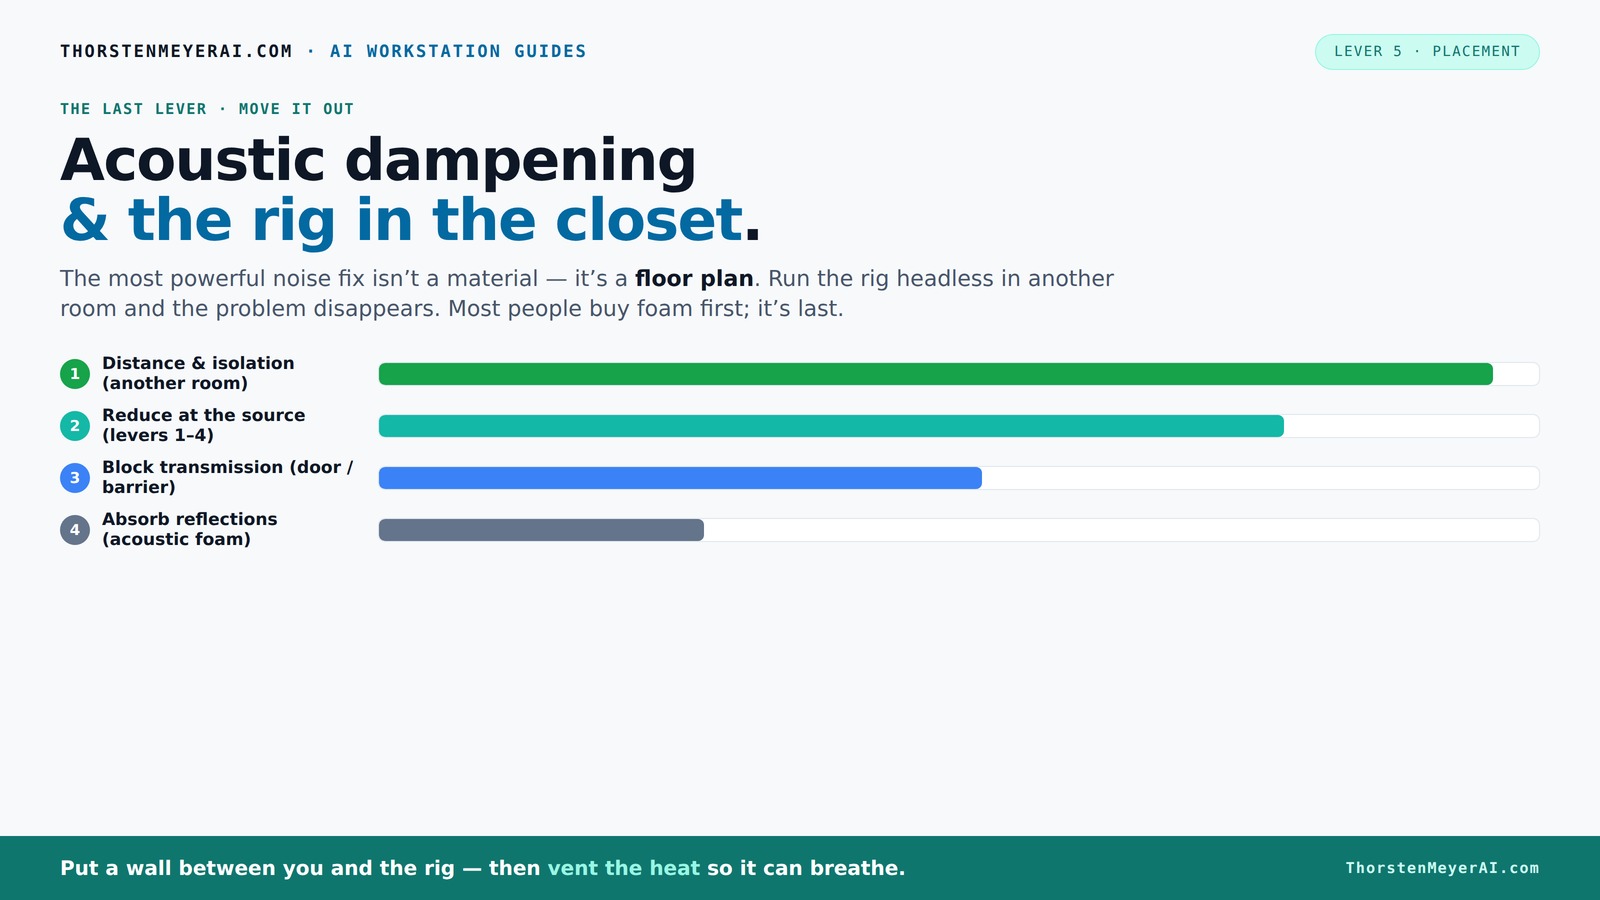
Acoustic dampening
& the rig in the closet.
The most powerful noise fix isn’t a material — it’s a floor plan. A rig you can’t hear because it’s in another room beats any amount of foam. Tap the approaches in Part 1 to see what actually works.
(another room)
(levers 1–4)
(door / barrier)
(acoustic foam)
Contain the noise, not the heat
Key Takeaways
- Moving your AI rig into a separate room or closet can cut noise dramatically—distance is your best friend.
- Proper ventilation is non-negotiable—trapped heat kills performance. Use exhaust fans or ducting to keep things cool. For detailed tips, see this guide on acoustic dampening and placement.
- Acoustic foam reduces echo but does not block sound. Seal gaps and add mass for true soundproofing.
- Treat reflection points—walls, ceiling, and corners—to improve recording quality in tiny spaces.
- Sealing the closet door with weatherstripping and acoustic seals prevents leaks and keeps noise contained.

TOUO 12 Pack Acoustic Panels – Sound Proof Foam Panels for Wall 12"x12"x1", Flame Retardant Wedge Acoustic Foam, High-Density Sound Absorbing Panels for Home Studio(Black, 1" Thick 12 Pack)
★ 【PROFESSIONAL SOUND ABSORPTION】:Our high-density wedge acoustic foam panels provide exceptional sound absorption, effectively reducing echoes, reverb, and...
As an affiliate, we earn on qualifying purchases.
As an affiliate, we earn on qualifying purchases.
Why Moving It Is the Most Effective Noise Solution
Putting your rig in another room is the simplest, most powerful way to cut noise. A wall or door between you and the machine makes almost all noise disappear. Think of it like a magic trick—once you’re on the other side, the noise no longer reaches you.
Imagine you’re working in a small apartment: your GPU rig hums loudly. Now, picture it tucked away in a basement, behind a closed door. Your workspace stays silent, even if the machine’s fans are spinning at full blast. That’s because distance and barriers are unbeatable in noise reduction.
With a network connection, you don’t need the machine next to you. You SSH into it, or access via API. The rig can roar in a closet, while your focus stays sharp at your desk. The key is reliable wired or strong wireless, plus ventilation for the closet itself.

Easy Cloud Computer Fan with AC Plug, 120mm Variable Speed Axial Muffin PC Fan with Controller 120V 110V 220V Small 12V Case Cooling for PC Server Cabinet DVR TV Router Receiver Xbox Greenhouse
【Speed Controllable】Easy Cloud axial fan 120v allows you to freely adjust the computer cooling fan speed according to...
As an affiliate, we earn on qualifying purchases.
As an affiliate, we earn on qualifying purchases.
How to Make a 'Rig in the Closet' Work Without Cooking It
Putting a high-power machine in a closet sounds perfect—until heat builds up. Trapped heat can cook your rig faster than you think. The trick is making sure the space breathes, because overheating not only risks hardware failure but also can cause thermal throttling, drastically reducing performance. Simply put, if your rig gets too hot, it won’t run at full speed, negating any noise or space-saving benefits.
First, add passive vents or ducting to facilitate airflow. Better yet, install a quiet exhaust fan that pulls hot air out and brings in cooler air. You can also explore acoustic dampening, placement, and the 'Rig in the Closet' setup for more insights. This airflow is crucial because it prevents heat from accumulating, which could lead to thermal shutdowns or hardware damage. Remember, fans and ventilation systems are a tradeoff—they can introduce noise if not chosen carefully, so select quiet models and position them strategically. You need to balance noise reduction with effective cooling.
Serious solutions include soundproof cabinets with temperature-controlled fans. These units combine acoustic foam with ducted airflow and thermostats, keeping noise down and heat out while maintaining safe operating temperatures. For DIY, a simple exhaust fan and some foam lining can do the job, but it’s vital to monitor temperature regularly, especially during prolonged workloads or high-performance tasks. Overheating can cause performance drops, hardware damage, or system instability, so ongoing temperature checks are essential for a safe, effective setup.
For more detailed info, check out the guide on [reducing heat and noise in AI workstations](https://thorstenmeyerai.com/reduce-heat-noise-ai-workstation/).

PartyKindom Thick Deadening Box: 11" X 9. 8" Sound Proof Enclosure For Booster Water Pumps - Black Sponge Acoustic Cover - Noise Reduction Barrier Cover
Professional water pump fitment: designed as a sound proof enclosure, this acoustic cover perfectly fits booster water pumps,...
As an affiliate, we earn on qualifying purchases.
As an affiliate, we earn on qualifying purchases.
Acoustic Dampening vs. Soundproofing: What Really Matters in a Closet
Acoustic dampening and soundproofing serve different purposes, and understanding that difference is key. To learn more about effective soundproofing techniques, visit this resource on acoustic treatment. Acoustic foam and blankets absorb sound reflections inside your closet, making your recordings clearer and reducing echo. This internal treatment improves the quality of sound within the space, but it doesn’t prevent sound from escaping — which is often the real concern when trying to contain noise.
Soundproofing, on the other hand, stops sound from escaping or entering the space. It involves sealing gaps, adding mass to walls, and decoupling surfaces—things like weatherstripping, dense panels, or even a second drywall layer. These methods create a barrier that reduces noise transmission beyond your closet, which is critical if you need to keep noise from disturbing others or prevent external noise from interfering with your recordings.
For a closet setup, your goal is often a mix: reduce internal echo with foam, then seal gaps around the door and walls to keep noise from leaking out. Remember, foam alone won't block sound—it's great for improving recording quality but not for isolating noise. Achieving effective soundproofing requires a combination of internal acoustic treatment and sealing all weak points where sound could escape.
According to experts, most noise leaks through gaps and weak points, not just walls or foam. Focus on sealing and adding mass at potential leak points for true soundproofing, understanding that tradeoffs between cost, effort, and effectiveness mean you may need to prioritize certain areas based on your specific needs.

24 Pack Black 12 x 12 x 2 Inches Pyramid Designed Acoustic Foam Panels, Sound Proof Foam Panels for Walls, High Density and Flame-Retardant Acoustic Panels, Sound Panels for Recording and Home Studio
Exceptional Sound Absorption:These pyramid acoustic panels are engineered to effectively absorb sound waves, reducing echo and reverberation. With...
As an affiliate, we earn on qualifying purchases.
As an affiliate, we earn on qualifying purchases.
Placement and Treatment: The Secret Sauce for a Tiny Studio
In a small closet, where you place your mic and treatment is everything. Start with your microphone—decide if you want vocals or voiceovers—and then treat the reflection points accordingly.
For vocals, the mic should be at least a foot away from any wall, ideally pointing into the room’s center. Absorption panels should go at the first reflection points—usually the side walls and ceiling—where sound bounces off and causes echo. Proper placement ensures that the sound captured is clear and free of early reflections that can muddy recordings.
Use a mirror technique: have someone move a mirror along the wall while you sit at your mic. Wherever you see reflections, place foam or blankets there. This method helps identify critical reflection points that, if untreated, can compromise sound clarity and create a boxy or echoey sound.
Coverage matters more than a single “magic” spot. Cover the wall behind you, the ceiling, and the side reflections for a balanced sound. For detailed placement tips, see this guide on acoustic treatment placement. Bass traps in corners can help tame low-end buildup common in tiny spaces, preventing muddiness and ensuring your recordings sound full and natural.
In this way, you turn a small, echoey closet into a controlled environment — ready for crisp recordings with minimal post-processing.
Door and Gaps: The Hidden Leaks in Your Soundproofing
The door is often the biggest weak point in a closet soundproofing setup. Gaps around hinges, locks, and weatherstripping let sound escape and noise sneak in. For solutions on sealing gaps, check out this article on acoustic sealing techniques. These leaks can significantly undermine your efforts, as even tiny gaps can transmit loud sounds or allow external noise to intrude, defeating the purpose of your acoustic treatment.
Seal gaps with weatherstripping, draft stoppers, or hanging blankets. Heavy, dense curtains can also act as a barrier, especially if you hang them over the door. These solutions help create a more airtight seal, which is crucial because sound escapes through even the smallest openings.
For a more airtight seal, add door sweeps or acoustic seals designed for studios. These are inexpensive but highly effective at blocking leaks, especially at the bottom of the door where most sound escapes. Remember, even tiny cracks can let a surprising amount of sound through, so spend time sealing every gap for maximum isolation.
Check out expert tips on sealing doors for soundproofing in the [soundproofing guide](https://www.soundproofcow.com/how-to-soundproof-closet/). Proper sealing not only improves sound isolation but also enhances the overall effectiveness of your acoustic treatments, making your space truly quiet and contained.
Corners and Low Frequencies: Taming the Bass Buildup
Small closets often trap low frequencies—bass and standing waves—right in the corners. Without treatment, this can make your recordings boomy or muddy, reducing clarity and making post-production more difficult.
Adding bass traps in the corners helps absorb these low-end resonances. You can DIY bass traps with rockwool or purchase ready-made panels designed specifically for low-frequency absorption. Proper placement—where walls meet ceiling or floor—is essential, as these are prime spots for bass buildup. If untreated, these resonances can cause a muddy, boomy sound that is hard to correct later.
Place traps where walls meet ceiling or floor—these are prime spots for bass buildup. For a quick fix, even thick rugs in the corners can help, but dedicated bass traps are more effective at absorbing the specific frequencies that cause muddiness. Low-frequency treatment is often the most challenging part of small-space acoustic treatment, but it’s critical for achieving a balanced, natural sound.
Proper treatment of low frequencies turns a boxy sound into clear, well-defined audio, even in tiny spaces, making your recordings sound professional and polished.
Check the latest advice on bass trapping in [soundproofing resources](https://thorstenmeyerai.com/low-noise-pc-cases-airflow/).
Floor, Desk, and Reflection Control: Covering All Bases
Reflections bounce off hard surfaces like floors and desks, adding unwanted echo and reducing clarity. Rugs, mats, and soft furniture absorb these reflections and improve sound quality. In tight spaces, every surface counts; untreated reflective surfaces can cause a boxy, harsh sound that’s difficult to fix in post-production.
Placing a rug under your chair or in front of your desk helps reduce floor bounce, which is a common source of low-frequency muddiness. Soft pads or foam under monitors and equipment can also cut down on high-frequency reflections, ensuring your recordings are clearer and more natural-sounding. Covering reflective surfaces with blankets or foam near your mic and recording area creates a 'soft bubble' that minimizes unwanted reflections, resulting in warmer, more professional recordings.
Think of it as creating a controlled acoustic environment within your tiny space. The more surfaces you treat, the more you improve clarity and reduce echo, making your setup sound more balanced and polished. For detailed coverage tips, see the [room treatment guide](https://thorstenmeyerai.com/reduce-heat-noise-ai-workstation/).
Key Setup Tips for a Quiet, Cool 'Rig in the Closet'
Combine all tricks: place your rig in a ventilated, sealed, but breathable cabinet or closet. Seal gaps, add bass traps, and treat reflection points. Use blankets or foam on walls, ceiling, and door. Ensuring proper airflow is critical; installing a quiet exhaust fan or ducting helps prevent heat buildup. Remember, heat can cause hardware throttling, reduce lifespan, or even damage components. Keep monitoring temperatures regularly, especially during intensive workloads, to ensure your system stays within safe operating limits. Use a network connection for remote control and monitoring—this keeps noise and heat out of sight and earshot, while you maintain control from your desk. With careful planning, your tiny closet can become a silent, efficient AI workstation—no more noise, no more heat drama, just a clean, controlled environment for your hardware to thrive. For detailed ventilation and setup, see [heat and noise reduction](https://thorstenmeyerai.com/reduce-heat-noise-ai-workstation/).